

Starting an online store can be a daunting task, but with the right tools and guidance, it can be a rewarding and profitable venture, too. Whether you’re a seasoned entrepreneur or just starting out, creating an online store can help you reach a wider audience and grow your business.
In this article, we’ll lead you through how to start an online store, from choosing an ecommerce platform to designing your website to launching your first product. With the help of this comprehensive guide, you’ll be well on your way to building a successful online store.
How to start an online store
- Decide on a target audience
- Find a business idea and choose your products
- Choose an ecommerce platform
- Determine your business structure
- Design your brand
- Set up your ecommerce website
- Connect a payment gateway
- Get your store ready for launch
- Launch your online store
- Market your online store
1. Decide on a target audience
A target audience is the group of people your marketing efforts are focused on. When starting an ecommerce store, knowing your ideal audience is critical. It helps you find new customers easier and attract interested buyers to your website, resulting in higher conversion rates and more sales.
You can make an audience of any size or attribute, depending on what products you plan to sell. However, there are three main categories to look at as a new ecommerce entrepreneur:
- Demographics. Includes characteristics such as age, gender, occupation, education, and income.
- Location. Groups that divide the market based on geographic location, so you can serve a specific area better.
- Interests. Built around psychographics and includes attitudes, personality, opinions, and the lifestyle of your audience.
Ask yourself: Who buys my product? What are they like? What’s their age? Compile that information into a buyer persona and include it in your business plan. You’ll want it when you create your website copy and marketing campaigns. If you don’t have a product, you can still narrow in on a target market and build a product around it.
📗 Read more: How To Reach Your Target Audience: 8 Strategies
2. Find a business idea and choose your products
One of the biggest challenges entrepreneurs face is finding profitable products to sell. Coming up with product ideas is a bit tricky, but if you have an audience in mind, you’re one step ahead. Fortunately, there are plenty of opportunities to find products to sell, whether you’re manufacturing, reselling, or dropshipping.
You can find profitable products to sell online in a number of ways:
- Appeal to enthusiastic hobbyists
- Go with your personal passion
- Capitalize on trends early
- Look at what’s trending in online marketplaces
✏️ Note: While this article is dedicated to helping you start an online store, you can refer to our comprehensive guide to starting a business to learn more about topics like branding, writing a business plan, choosing a product, and finding a manufacturer.
📚 Resources:
- Product Sourcing Guide to Sell Online
- Product Ideas: 17 Places to Find Profitable Products
- 17 Trending Products to Sell Online
3. Choose an ecommerce platform
When you’re learning how to start an online store, one of the biggest decisions is which platform you will use. An ecommerce platform lets you build and start an online store experience, make sales, and fulfill orders.
When considering how to make a website to sell online, think about your ecommerce platform as the control center for your entire business, controlling everything from inventory to marketing, giving you all the tools you need to sell online and provide customer support.
Key features to look for in an ecommerce platform include:
- Usability. Your ecommerce software should be easy to use. Look for a tool that is intuitive and uses a drag-and-drop online store builder to easily create your online store.
- Accessible customer support. Look for a platform that offers support the entire way.
- Friction-free checkout. Streamlined checkout is critical to making sales. Find an ecommerce platform that makes it easy for shoppers to buy your products.
- Web hosting. You need web hosting to let people access your online store. Some ecommerce software offers web hosting built-in, while others require you to use a third-party solution.
When choosing your ecommerce software, consider your current and future needs. Some platforms may be the best solution for today, but a powerful platform like Shopify can get you started quickly and support your future growth.
4. Determine your business structure
You’ve finished all the fun parts of starting an online store: choosing your name, building your site, finding products, writing product descriptions. But before you launch, you want to make your new business legal.
While it’s not the most enjoyable job, incorporating your business is a must. A legal entity recognized by the government protects your personal assets if something goes wrong. It also helps you:
- Potentially receive a lower tax bill
- Secure business funding more easily
- Create retirement plans
- Separate credit rating from your personal score
Common business structures for new business owners include:
- Sole proprietorship. An unincorporated business without legal distinction between the company and the individual running it. It qualifies as a non-employer business and is the most straightforward to set up and manage.
- Partnership. A single business with two or more owners. Each owner contributes to the business via funding, property, labor, or skill. Partners share responsibility and profits.
- Limited liability corporation (LLC). A hybrid business structure that combines partnership with the liability protection found in corporations.
📗 Read more: The 4 Most Popular Types of Businesses and How To Choose One
5. Design your brand
Before you begin designing your ecommerce website, you’ll need to consider branding. Create a brand identity and develop brand assets to use throughout your online store and across other channels. Be sure you’ve developed the following elements to plug into your store design.
Before Verve designed its online store, it made deliberate choices around fonts, colors, logo design, tone of voice, and other aesthetic elements to ensure consistency in branding across its properties:

Brand values and mission
Before designing brand assets like a logo or color palette, decide what your brand stands for, your purpose, your unique selling proposition, and your brand promise to customers. These decisions will help shape the visual look and feel of your brand.
Business name
Choose a business name that represents your brand, whether it’s your own name, a made up word, or a literal description of what you sell. If you’re stumped, try Shopify’s free domain name generator and run your ideas through a tool like Namechk to see if your business name ideas are available on social and as a domain.
Logo
Whether you work with a designer or design your own logo, it is an asset that will represent your brand across a number of surfaces, from your online store to your packaging. Be clear about what you want your brand to represent, including your mission, values, and tone, as these will help a designer nail your look.
Lifestyle and product photos
Clean product photography helps you put your best foot forward. If you’re on a budget, you can shoot your own product photos with your smartphone camera and use free stock photos until you can shoot your own custom lifestyle photos.
📗 Read more: How To Design a Visual Identity for Your Brand: Ideas for Every Budget and Skill Level
6. Set up your ecommerce website
Now you’re ready to start building your ecommerce site. Follow these steps to make sure you’ve completed every task on your ecommerce checklist before you launch.
1. Add your products
In your ecommerce platform, head to the “Add a product” section. Here, you’ll add all the content, assets, and details about your product.
Writing product titles and descriptions
Your product title should make it clear what the product is. This is what customers will see as they browse your store and what will help them find what they’re looking for in your catalog. Try to keep it short and use your product description or variants to surface other specific information or product options, such as colors or sizes.
Product descriptions describe and sell your product. When writing them, keep the following in mind:
- Know who you’re speaking to. Think about what your customer needs to know to feel confident buying your product and try to communicate it in your description.
- Highlight incentives. Consider what features, benefits, and offers really matter—and cut the fluff. Many stores mix text and icons to quickly communicate these selling points on their product pages.
- Anticipate common questions or objections. What might make a customer hesitate to buy? Are they afraid of buying the wrong size? Do they need allergen information?
- Make your text easy to scan. Make your descriptions easier to read with short paragraphs, bullet points, subheadings, bolded text, etc. Or use nested navigation to organize information into tabs.
- Help customers see themselves using your product. Customers can’t taste, feel, touch, or try on your products. List the materials you use, include a size chart, etc.
In this example, skin care brand Frank Body uses its product description to talk about the product’s benefits and ingredients, while also maintaining the brand’s tone of voice:

Uploading product photos or other media
On most ecommerce platforms, you can upload visual media that helps you share richer details about your products: photos, GIFs, videos, or even 3D models.
Presentation makes all the difference. Help customers imagine owning your product. Help them see it in action or proudly displayed in their space. Here are a few points to remember:
- Use high-quality photos. Avoid blurry, poorly lit, or low-resolution images.
- Maintain the same aspect ratio. A consistent aspect ratio ensures that all your photos appear the same size. This creates a cleaner, more professional appearance when you create your online store.
- Use the tools you have. If you’re on a budget, many smartphones are capable of shooting high-quality product photos. Use free photo editing tools to touch them up.
- Add necessary details. Edit the alt text for accessibility (describe your photo visually so it can be accessible to screen readers).
On its product pages, ReFramed uses several clean product shots on plain backgrounds to show every detail without distraction:
 Farther down the page, customers can see lifestyle photos that help them envision the brand’s bed frames within the context of their own lives:
 💡 Tip: For products where the customer might need more visual information, such as clothing or jewelry, using multiple photos that offer additional angles or details can help improve customer trust.
Setting your price
Several variables can influence how you price your products, such as shipping costs, raw materials, overhead like rent or employees, the cost of your time, and, perhaps most important, the perceived quality of your products.
You can always revisit and adjust your prices based on what you learn after you start marketing. You may discover that customers are actually willing to pay more for your products, or you may find creative ways to cut costs and increase the average value of every order you get.
While there are some exceptions, businesses that sell goods and services have to collect taxes each time someone orders from them, so be sure to configure your tax settings.
📗 Read more: Rule the Market: 14 Retail Pricing Strategies
Managing your inventory
Depending on your business model, you may need to track, store, and manage inventory. Some exceptions include dropshipping and print-on-demand online stores. When building your online store, you can use features or your ecommerce platform (and third-party apps) to help you.
Some terms you may encounter in your online store admin:
- SKU. A stock keeping unit (SKU) is used to track and manage your inventory for specific products and variants. Create a consistent system using numbers or letters that makes it easy for you to identify what the exact item is at a glance.
- Bar code. Bar codes (UPC, GTIN, etc.) are typically used if you’re reselling products or eventually want to add scannable bar codes to your items for easier inventory management.
- Quantity. This is how much of a specific product you have on hand. If you have multiple locations holding inventory and have them set up in Shopify, they’ll display here.
📗 Read more: What Is Inventory and Why Is It Important?
Setting shipping details
In the shipping section of your online store admin, you’ll enter details that will automatically calculate shipping rates and print the appropriate shipping labels for each order. Setting the actual shipping costs and options that you’ll offer to your customers will come later on in this tutorial.
Adding product options
If your product comes with different variants, like sizes or colors, instead of adding each one as its own product, you can simply add them as variants of the same product. Each option can have its own image, price, tracked inventory, and individual settings associated with it.
You can even drill down further on your options, for example, offering multiple colors that each come in different sizes. In this example from LNDR, a pair of its athletic pants has layered variants for size, length and color:

Organizing and tagging your products
Your ecommerce platform will offer other fields on the product page builder to help you better organize your catalog. On Shopify, some of the fields include:
- Product availability. Set your product to “available” (you can toggle sales channels on and off later).
- Product type. This is a product category that you can use to identify certain products (e.g., t-shirt).
- Vendor. This is the manufacturer, wholesaler, or third-party vendor for the product (if applicable). You can filter your product list by vendor, which can speed up ordering inventory.
- Tags. Tags are keywords that you can associate with your product. You can add multiple tags to a product to help customers find it through your online store’s search bar.
- Collections. Collections are important. They let you organize and curate your products for specific purposes and audiences.
Grouping your products into collections
Collections can be created to curate products to target a specific audience, a theme, or product category. Organizing products this way can help you feature products on your page by event or season, like highlighting candy before Halloween, or make changes to a group of products such as putting a whole collection on sale.
Most importantly, collections help with navigation and often appear in the main menu or top navigation of an online store. This example from Cocofloss shows collections by popularity (Best sellers), type (Cocofloss), and audience (Kids):

Setting search engine listing details
You can improve the discoverability of your products through search engines like Google by using best SEO practices to write a page title, page description, and URL to represent your product page.
If you know what keywords your target customer is using to search for products like yours, you can work them into these fields to increase your odds of ranking in search results.
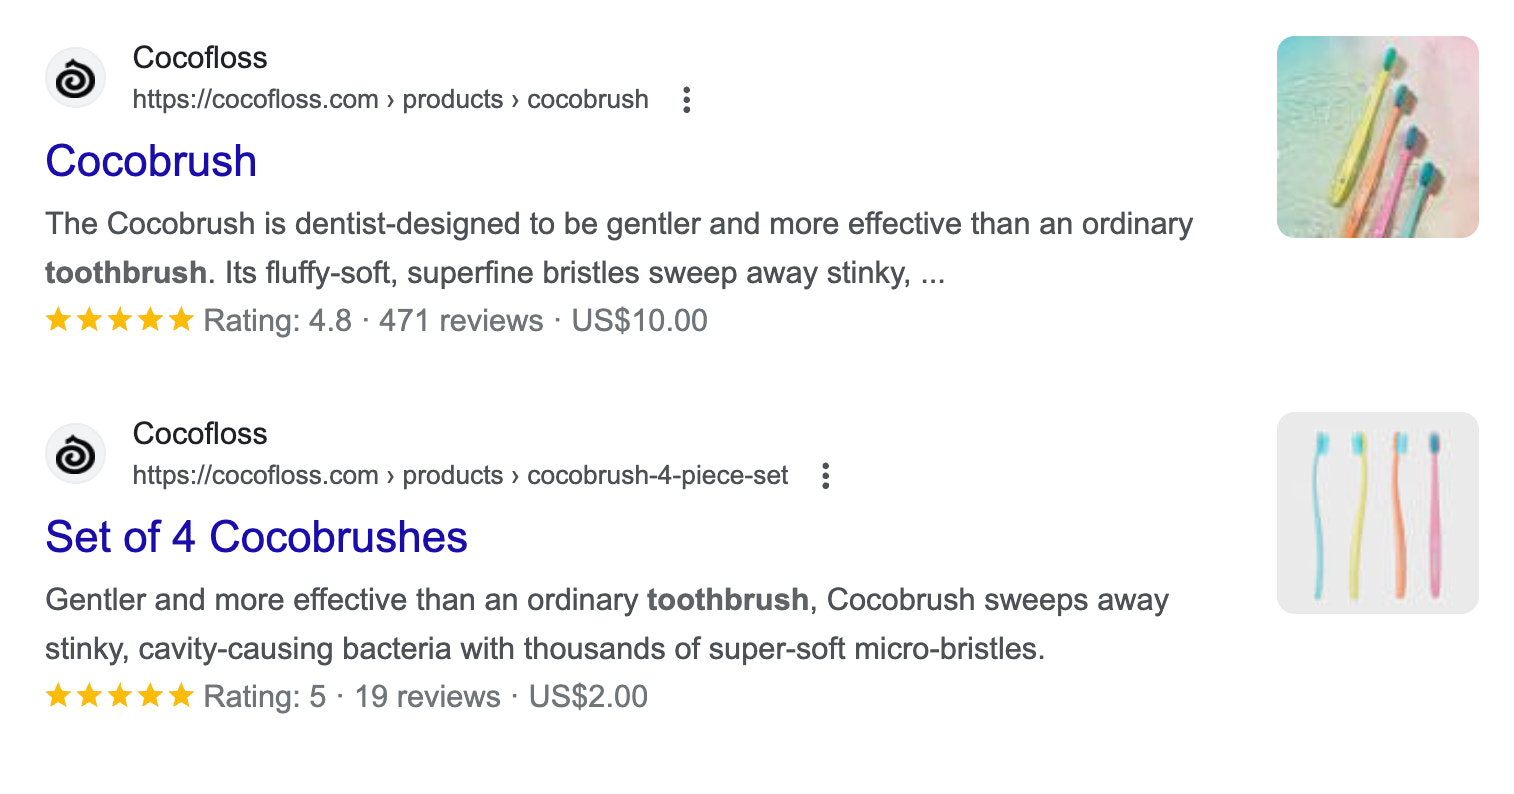
For the example above, here’s how the search engine listing looks for two Cocofloss products:
📗 Read more: Keyword Research for Ecommerce: A Beginner’s Guide
2. Create key pages for your online store
Aside from product pages, there are a few critical pages to set up for your online store. These pages help build trust, tell your brand story, answer common questions, and let customers know how to reach you. These include:
- Contact page
- About page
- FAQ page
- Policy pages
About page
About pages are a great way to embrace the “small” in “small business” and earn trust as a new merchant while you create your online shop. You can have a video introducing yourself as a founder, links to awards and press mentions, images that explain your supply chain, or anything that helps this page tell your customers who you are and what you’re about.
Contact page
Your Contact page is what customers will look for to ask a question or get support. A physical address, phone number, email address, contact form, and customer support hours are all helpful pieces of information to include. There are also live chat apps you can install to make support even more accessible to shoppers.
Policy pages
Policy pages are standard practice for online businesses. They give your customers a place to understand how you conduct your business and what to expect from you. They also help protect you in case of a customer dispute. These include:
- Return policy. What’s your policy regarding returns and exchanges? A generous return policy can help customers buy from you with confidence.
- Privacy policy. A privacy policy describes how you collect information about your customers.
- Terms of service. Your terms of service policy is an agreement between you and your customers outlining how you will operate and what rights you reserve.
- Shipping policy. A shipping policy helps you set customer expectations around shipping costs, manufacturing times, and delivery speeds for the regions you ship to.
💡 Tip: Just like you did for product pages, customize the search engine listing details for your pages based on what you want the URL to be and how you want the page to appear in search engine results.
3. Create an online store that’s completely customized
Now that your ecommerce store has some products and content, you can customize its overall design (and see how those changes look on various pages).
Choosing an ecommerce theme
The first step is to choose a theme: an ecommerce template that you can use as a starting point for design as you build your own online store. Most ecommerce platforms have a suite of themes you can choose from. For example, the Shopify Theme Store is home to both free and paid themes, each with its own set of styles and features:

Here are some key points to consider when choosing the perfect theme for building your own store:
- Filter themes based on your business size, catalog size, volume of orders, industry, and product type. Some themes are better suited to fashion stores, for example, while others are designed for high-volume businesses.
- Consider whether the theme you’re looking at has any built-in features you need, like a search bar that auto-completes queries or a section that displays press mentions.
- Don’t pick a theme based on colors or fonts. These are all things you can customize later.
📗 Read more: How Do You Pick the Best Theme for Your Online Store? Take Our Quiz
Designing your homepage
When determining your homepage design, think about the goals a homepage needs to accomplish and determine how they apply to your specific business:
- Prioritize first-time visitors and help them quickly understand what your business is and what you sell.
- Accommodate returning visitors and make it easy for them to navigate to the products and pages they’re looking for.
- Try to build interest in your products and trust in your business with every scroll.
- Create clear paths for your visitors to take based on their intent to purchase. Avoid clutter.
- Design your homepage with the assumption that many of your visitors will be browsing it on their mobile devices.
This uncluttered homepage by Allbirds prioritizes full-width lifestyle photos and a clear path to shop the brand’s two main collections:

Customizing your navigation menus
There are three main forms of navigation you can set up for your online store:
- Main navigation. This is the top menu where you can prioritize the main navigation paths you want to offer customers.
- Footer navigation. This is where you keep links to non-essential pages that might distract new visitors but still need to be available for those who need to find them.
- Search. You can enable the search bar in the header to help visitors directly navigate to what they’re looking for.
You don’t want to overwhelm people with too many options from the get-go. Instead, you can organize your navigation to prioritize the actions you want visitors to take—with a focus on shopping, of course.
Setting brand colors, typography, and other design elements
Colors and typography play a big role in your brand’s visual identity and should be a top consideration when you build your brand and your own online store.
Even if you’re not a designer, you can still build your own store and pick font and color pairings you feel good about using the following tips:
- Most themes allow you to customize colors and fonts. Use those from your brand guidelines or style guide.
- Consider psychological design and how different colors make people feel.
- Use contrast to highlight important features of your homepage, such as buttons.
- Try to pick two fonts (a maximum of three) to use across your store.
- Choose a body font that is easy to read (sans serif fonts like Helvetica are generally easier to scan on a screen).
- Add your logo to appropriate places across the site, including the favicon.
In this example from Then I Met You, the brand’s homepage features limited fonts that are easy to read, a color palette that evokes calmness and self-care, and branded elements like a page logo and product packaging:

Customizing your checkout
Customizing the checkout of your online store means adjusting settings, messaging, and other details that dictate the checkout flow for customers and help you accept payments online. Some of the options available on most ecommerce platforms include:
- Customer contact. You can let customers choose how they want to be contacted by you after placing an order (email or SMS text messages).
- Form options. Here you can decide whether extra information like a first name or company name is hidden, optional, or required at checkout.
- Order processing. You can find options to streamline the ordering process or add an additional confirmation step.
- Abandoned checkouts. When a customer reaches your checkout and decides not to complete their purchase, you can set up an automated reminder email for these shoppers.
- Customer accounts. You can choose whether you want customers to create an account at checkout. This can be useful if you’re running a wholesale or members-only store.
Customers on ban.do’s website can opt to check out as a guest, sign in, or create an account before they purchase:

💡 Tip: When in doubt, prioritize choices that reduce the friction of checking out for the majority of your customers.
📗 Read more: Ecommerce Checkout Best Practices: 11 Tips for Success
4. Establish shipping settings
Shipping can be one of the most complex considerations involved in running an ecommerce website. Between product weights, packaging costs, shipping destinations, carrier rates, and your potential profit per order, there are a lot of variables to juggle.
Depending on the unique needs of your business, choose a shipping strategy (or bundle a few) that works for you. Some of these include:
- Offering free shipping. This can be an incentive for customers to shop with you, whether it’s applied to certain products, order minimums, or regions of the world.
- Charging real-time carrier rates. Many platforms integrate in real time with carriers like USPS and Canada Post to generate shipping options and live pricing.
- Charging a flat rate. Flat-rate shipping works best when your products have similar sizes and weights, making actual shipping expenses easier to predict.
- Offering local pickup/delivery. You can also give local customers the option to pick up their online order at one of your locations, setting specific notification settings, pickup instructions, and other details for each location.
📗 Read more: Beginner’s Guide to Ecommerce Shipping and Fulfillment
Sell internationally in minutes with Shopify Markets
Shopify Markets helps you sell to multiple countries and scale your business internationally—all from a single Shopify store. Manage store localization, shipping, duties, and compliance all in one place.
Discover Shopify MarketsWithin the shipping settings of your ecommerce platform you’ll also set shipping zones (where you ship and what delivery methods are available) and conditional shipping rates (e.g., for bundling multiple goods or shipping overweight items).
In this example from Momofuku’s ecommerce site, customers are prompted to spend more to reach the free shipping threshold:

5. Set up taxes
As a business that sells goods or services, you will likely need to collect taxes to send to the government each time someone orders from your store. Some exceptions apply, such as for digital goods in many jurisdictions, or for businesses that generate revenue under a specific threshold.
If you are required to collect and remit taxes, be sure to adjust the settings in your online store’s admin. You may need to set taxes by region, depending on whether you do business.
🚨 Note: Consult with an accountant or tax professional if you’re uncertain about your tax situation.
7. Connect a payment gateway
Next up is deciding your store’s payment methods and how you, as a store owner, will get paid. There are hundreds of payment gateways to choose from and some platforms like Shopify have their own gateways that help save you money by lowering or removing transaction fees.
Once you choose a gateway, you will also:
- Choose payment options. Decide what payment methods you will allow customers to use. This can include credit cards, accelerated one-click payment options like Apple Pay and Shop Pay, or services like PayPal.
- Sell in multiple currencies. If you sell internationally, enable a currency selector to automatically convert your prices into the customer’s currency.
- Set your payout schedule. You can receive your payout daily, weekly, or monthly—it all depends on your preferences when it comes to your cash flow.
- Toggle extra fraud prevention measures. These include requiring CVV or postal/ZIP code verification to add an extra layer of security.
- Customize how you appear on your customer’s bank statements. This will help them connect a purchase to your online store.
Start accepting payments fast with Shopify Payments
Skip lengthy third-party activations and go from setup to selling in one click. Shopify Payments comes with your Shopify plan, all you need to do is turn it on.
Discover Shopify Payments8. Get your store ready for launch
There are a few additional steps to ensure your store is professional and ready to accept customers. These include:
- Adding a custom domain
- Installing relevant sales channels
- Customizing your email/SMS notifications
Adding a custom domain
Buying a domain is like claiming land on the web. That’s why it’s called a “web address.”
A custom domain is a fully branded URL that replaces the default URL that was created based on the store name you chose at setup. Navigate to the settings of your store and update your domain with the one you purchased at the start of these steps, or buy one from your ecommerce provider.
📗 Read more: Find and Register Your Domain Name With Shopify
Installing relevant sales channels
In addition to your own online store, there are additional sales channels you can use to sell your products. Not every sales channel will be relevant for your unique business, but here are some that are worth highlighting:
- Point of sale (POS). Many platforms offer point-of-sale solutions for accepting in-person payments and easily syncing physical retail sales with your online store and inventory.
- Social networks. You can sell your products on Facebook and Instagram, set up a shop on TikTok, and more.
- Marketplaces. Many shoppers start their purchasing journey on marketplaces like eBay, Amazon, Etsy, or Walmart. You can sync these sales channels with your online store.
- Google. Google is the most popular search engine in the world. Run Google Shopping campaigns and list your products for free in the Shopping tab in Google search results.
Customizing your email and SMS notifications (optional)
You can use automation to set up email flows so that customers receive timely messaging at every stage of their journey from opting in to your email list to making a purchase to tracking their delivery. These help you increase productivity and reduce customer service debt.
📗 Read more: Level Up Your Marketing Automations: Ezra Firestone’s Expertise in New Templates
9. Launch your store 🚀
You’re finally ready to launch! Most ecommerce platforms require you to set your store to live or remove password protection so people can find you and access your website.
Is your store perfect? Maybe not. But you’ve completed all the critical steps to get your store ready for orders. Going live helps you collect feedback in real time and tweak your design, settings, and messaging as you grow.
Here are some next steps and resources to help you ramp up your business after launching:
- Attract customers to your online store
- Drive traffic to get your first sales
- Learn from your traffic
- Optimize your store
When you go live, you can treat this as a “soft opening” for your business, testing the checkout and navigation with real transactions and beta testers (hint: these can simply be friends and family). Once your store is working as intended, announce your launch to the world!
📗 Read more: 11 Grand Opening Ideas for Any Business
10. Market your online store
Marketing is different for every business, but regardless of your strategy, it’s important to set up the right foundation to get the most out of your efforts as you drive traffic to your store. Dive into some of the elements of marketing for online stores.
Social media marketing
Social media marketing involves both using social platforms to share content and grow an audience organically and running paid social ads. Here are a few tips to get the most from social media marketing for your business:
- You don’t need every channel. Start with channels where your audience is already hanging out. For example, if your target customer is Gen Z, TikTok is a critical marketing channel.
- Don’t sell, add value. Ads and branded content should flow seamlessly with organic content flowing through users’ feeds. Add value with content that’s relevant, timely, helpful, and suited to the platform.
- Be consistent. Be sure your brand shows up on social media in the same way it does on your online store, with consistent colors, imagery, and tone of voice.
- Use social selling tactics. Enable shopping features on each channel to remove friction and leverage your link in bio to push followers to products, landing pages, contents, or special offers.
📗 Read more: Social Selling: Tips and Strategies for Success
Search engine optimization (SEO)
Many shoppers turn to Google and other search engines as part of their purchasing journey, whether it’s to find a product they saw or heard about through a friend or they’re conducting some comparison shopping for a purchase.
Helping your online store’s pages and your products appear in these search results can generate organic traffic. You can achieve this with SEO tactics.
You already considered SEO when you set the search engine listing details and product descriptions for your website. But there are other areas of your store where you’ll want to keep SEO in mind, like blog pages.
Some SEO tips to drive traffic:
- Use a free keyword research tool like Keyword Surfer to find keywords with search volume and prioritize keywords that are directly relevant to your business.
- Create content that answers common queries related to your product so that it may appear in search results for those keywords.
Crafting influencer and owner of craft store Made Everyday Dana Willard’s content appears in search results for “how to make a quilt” for this YouTube video and blog content on her site:


📗 Read more: The Complete SEO Checklist
Analytics
One of the most important aspects of marketing is analytics. When you monitor traffic and sales generated by your store across all your sales and marketing channels, you can get a better understanding of what works and what doesn’t. That means you can put your energy and time into campaigns and channels that have the best return on investment (ROI).
Drive your business forward with Shopify’s analytics
Shopify's user-friendly reports and analytics capabilities help you make better decisions, faster. Choose from pre-built dashboards and reports, or build your own to spot trends, capitalize on opportunities, and supercharge your decision-making.
Explore Shopify’s analyticsCreate a successful online store today
Now that you know how to start an online store, you’re ready to put your knowledge to work! You can sell anything online, including handmade products, merch, and digital products. Your ecommerce business will be a work in progress as you grow. Build a profitable online store by reaching your target customers with the messaging and products they’re looking for.
Additional research by Dayna Winter
How to start an online store FAQ
Can I start an online store with no money?
You can start an online store with no money by creating a free trial with most ecommerce platforms. Expect to spend a small amount, however, for basic plans on most platforms.
How much does it cost to start an online store?
The cost to start an online store depends on a number of factors. Expect, at minimum, to pay a monthly fee for ecommerce web hosting and a plan, as well as transaction fees. Some plans start as low as $5 per month. You will also need to factor in associated costs like paid ads, inventory, and overhead expenses like internet, electricity, and rent.
How do I start my own online shop?
To start your online shop, you first need to have a brand and a product or service to sell. Then, set up an online store on an ecommerce platform, including adding design customizations, products, and key pages to your online store website. Launch your store and market it to gain customers.
How can I create an online store without inventory?
Depending on your business model, you can create your online store with no inventory. These models include dropshipping and print on demand. With these methods, another party, like a vendor or print-on-demand service will handle the shipping for you. You will manage the sales, marketing, and customer service for your online store.
What is needed to run an online store?
To start an online store, you will at minimum require a device like a laptop or mobile phone, internet access, an ecommerce platform, and startup funds to pay for web services and other fees. As you run your online store, you may need to pay for inventory, invest in packaging supplies, find space for storage and order fulfillment, and pay for professional services and ads, depending on your business model.